先聊下传统的http半双工协议,只能客户端向服务端发送请求,然后再响应,因此,在一些有严格要求的低延迟需求上,websocket作为一种全双工通信协议无疑是应对这需求的很好的技术,像如今的一些股票的数据,如果仍然使用传统的http,只能每次有新数据就刷新页面来获取最新的结果,会导致大量资源浪费,响应速度大大降低。当然,现在也有一些http长轮询,流化技术可以不断刷新界面来获取数据,当然不是最好的解决方案,和长轮询不同,websocket只用发一次请求,一旦建立连接后,服务端不需要等待来自客户端的请求,同样,客户端可以任何时候向服务器发送数据,大大减少了延迟。本次网站用户与用户之间的通信基于websocket技术实现,由于我的后端框架是django,而django有个库可以处理websocket请求-channel,使用命令安装channels配置
pip install channels channels-redis
前端可以使用new websocket来创建websocket对象
const websocket = new WebSocket(
        'ws://'
            + window.location.host
            + '/ws/chat/'
            + local_user
            + '/'
    );
websocket对象可以调度4个事件,分别是open,close,message,error。时间对应的回调函数分别为onopen,onclose,onmessage,onerroe。onopen函数在服务器响应了了websocket请求后触发并建立一个连接,onclose函数在websocket连接关闭后触发,onmessage在接收到服务器消息时触发。了解基本知识后我们开始实现用户之间的通信功能吧。配置通信聊天的路由,在app中新建一个routing.py文件,代码如下
from django.urls import re_path
from . import consumers

websocket_urlpatterns = [
    re_path(r'ws/chat/(?P\w+)/$',consumers.ChatConsumer),

]
通过路由,找到消费者,这里我们编写一个消费者实例,对于channels库消费者不了解的看看官网文档,我们可以用channel中的消费者制作asgi的应用程序,就像我们用之前的视图来制作wsgi应用程序。我们在routing.py同目录下创建consumers.py文件,代码如下
import json

from channels.generic.websocket import AsyncWebsocketConsumer
from .models import Message,UserProfile

from asgiref.sync import async_to_sync
from channels.layers import get_channel_layer
class ChatConsumer(AsyncWebsocketConsumer):

    async def connect(self):

        if self.scope['user'].is_anonymous:
            await self.close()

        else:


            self.group_name = self.scope['user'].username


            await self.channel_layer.group_add(
                self.group_name, self.channel_name
            )


            await self.accept()

    #离开聊天组
    async def disconnect(self, close_code):
        await self.channel_layer.group_discard(
            self.group_name, self.channel_name
        )

        await self.close()
    #接收前端发来的私信消息
    async def receive(self, text_data=None, bytes_data=None):
        print('打印下消息',text_data)
        await self.send(text_data=json.dumps(text_data))
为了提高并发能力,这里全部采用异步模式进行通信,这里我们可以看到通过websocket请求,找到路由,然后找消费者实例,先判断当前用户是否登录,没登录的话关闭连接,登录的话将当前channel加入group,这里注意下:Channels引入了一个layer的概念,channel layer是一种通信系统,允许多个consumer实例之间互相通信,以及与外部Django程序实现互通。Channel layer主要实现了两种概念抽象:1:channel是一个发送消息的通道,每个channels都有对应的名称,每一个拥有channel名称的人都可以往channel发送消息。2:group一般由于1个或多个channel组成,每个group有独一无二的名称,可以对group进行增加删除channel,像group发送消息时,里面的所有的channel都可以接收到消息,但不能给group中具体的channel发送消息。咋一听,感觉group相当于我们qq中的群聊样的,只不过加了个禁止私聊的功能。channel相当于群成员且名字不重复。因此这就对应起来了,一个group至少一个channel。话说,那这样我直接用channel单独可以实现用户与用户之间的私聊吗,翻阅官方文档,好像有个单通道,但是这个实现起来有点难度,因此我将group和channel结合使用的。如上代码如果当前用户登录了,则将当前用户为组名将当前channel名加入该组,断开连接时从group移除channel即可,其中的receive是接受前端发来的消息,然后通过send方法将消息发送到前端,总体过程如下所示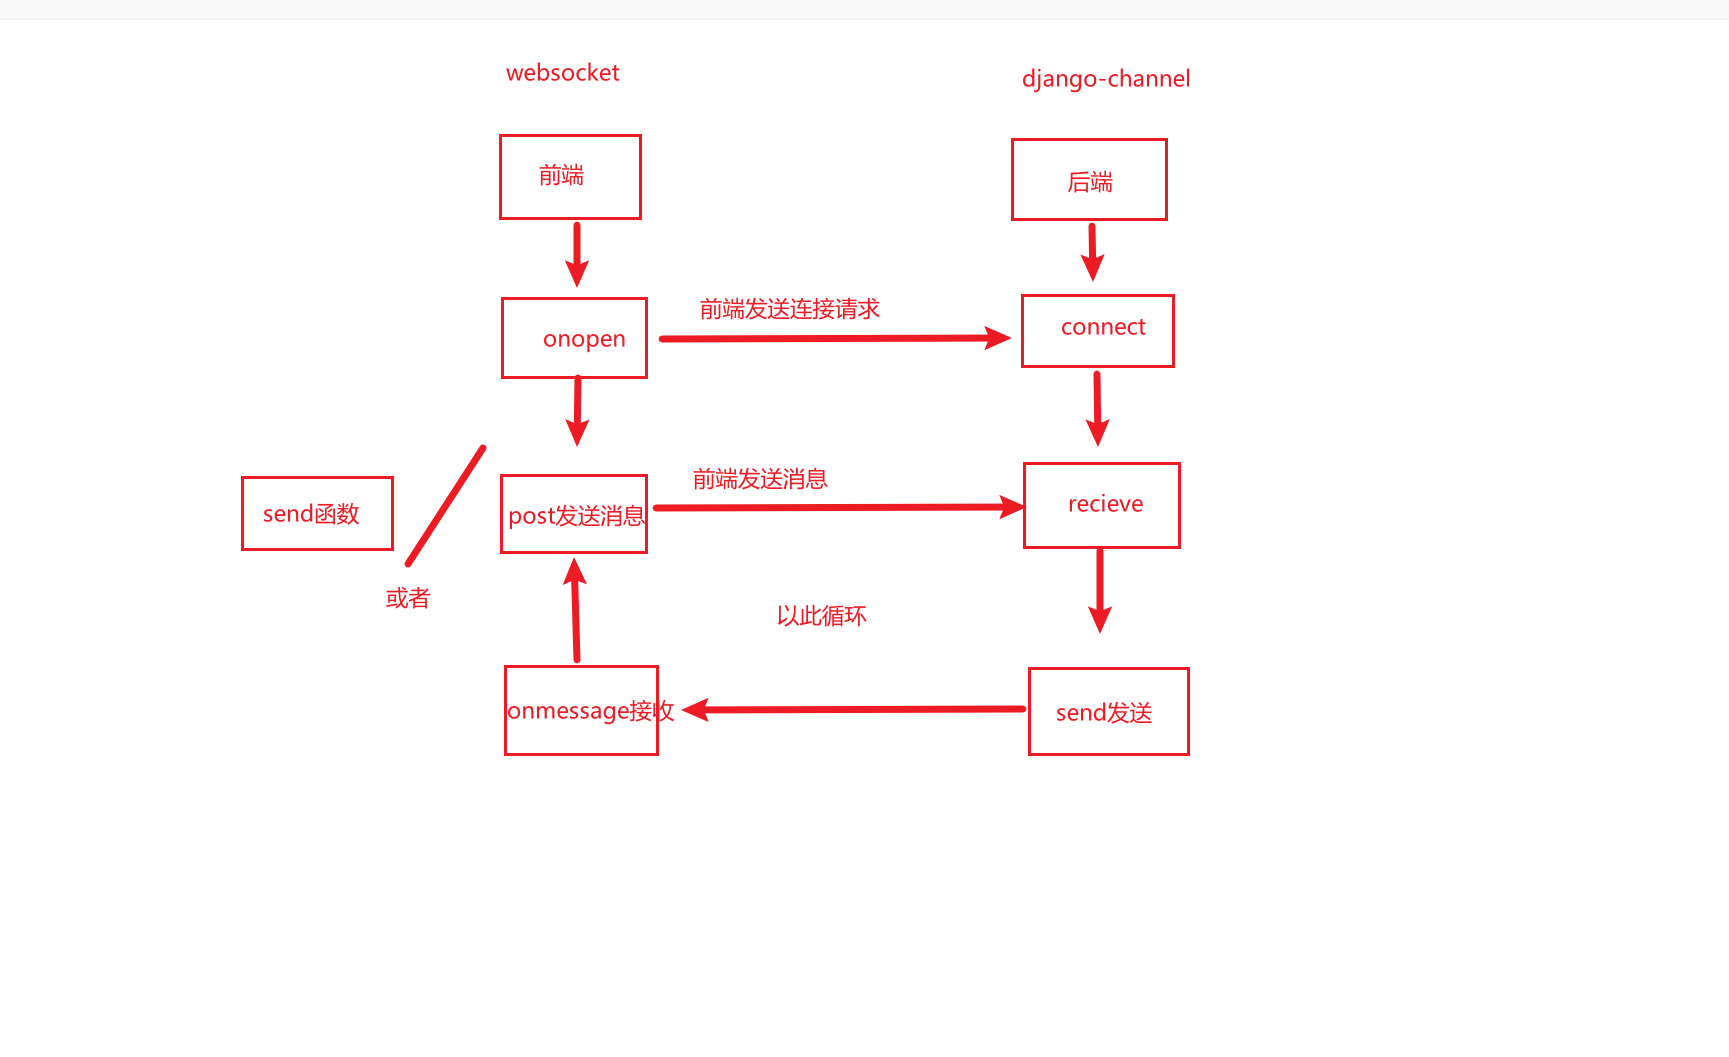
由于为了安全,消息都存入数据库中,因此前端发送消息不通过websocket的send函数来发送,直接使用post提交。为了实现一对一通信,如图所示的效果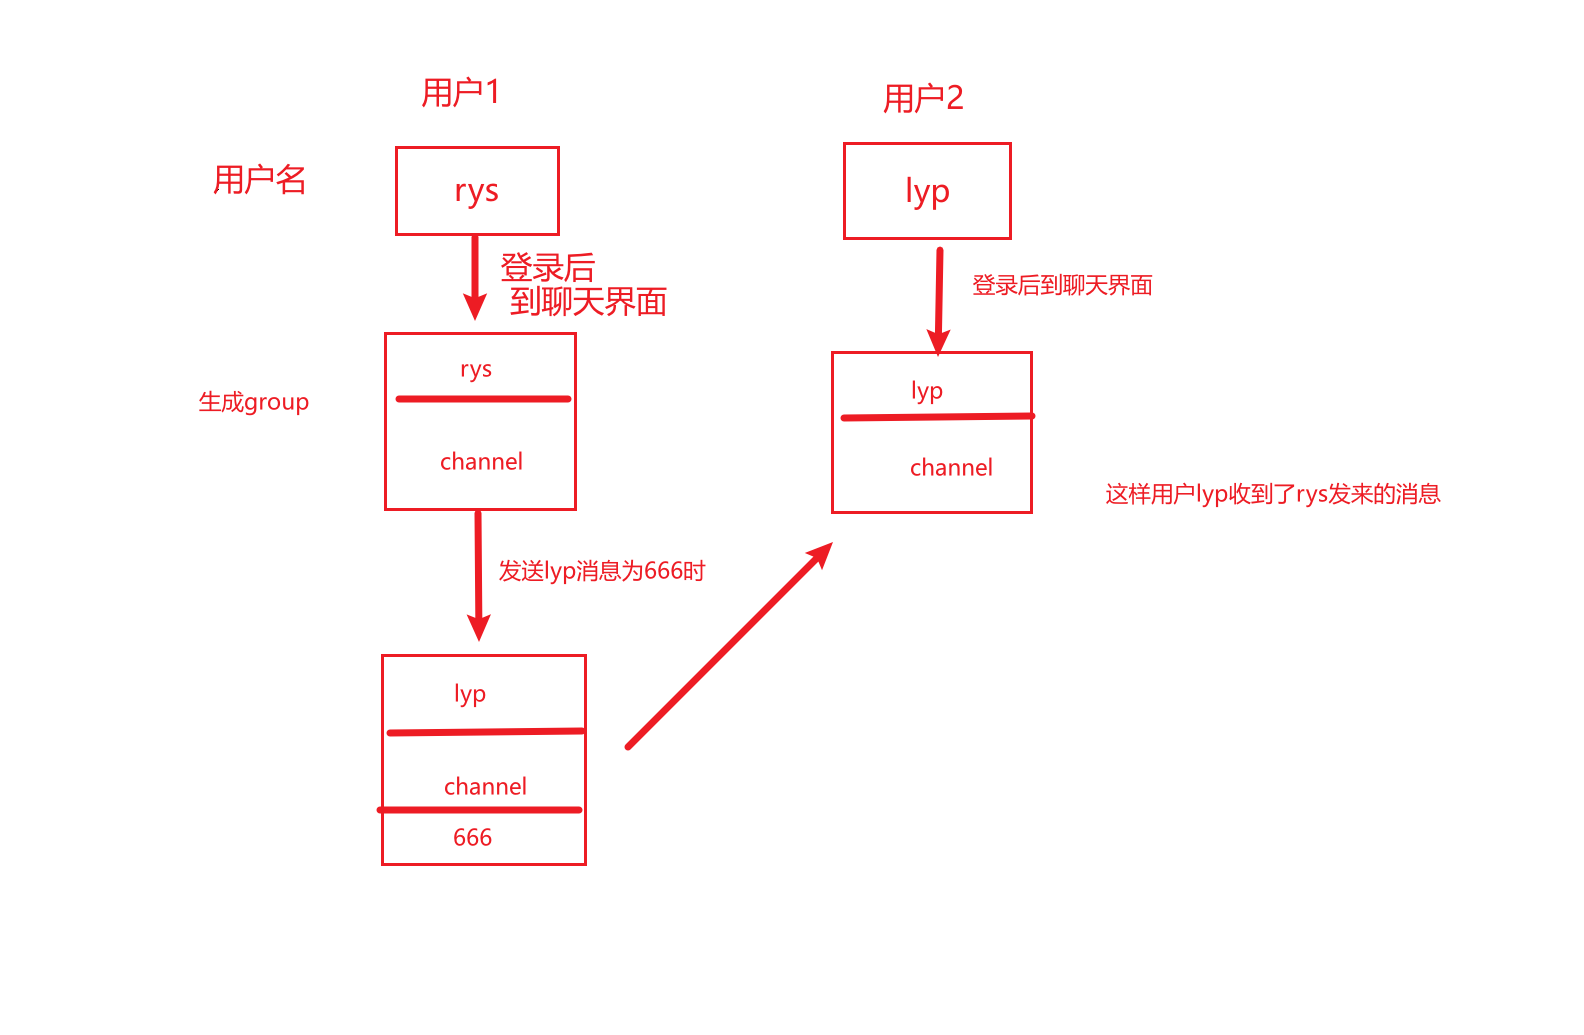
原理基本明了了,我们先看下前端实现,我前端聊天界面是chat.html,里面主要代码如下
<script type="text/javascript">
    const local_user = "{{ local_user }}";
    var activeUser = "{{ to_user }}";
    console.log(activeUser+666);
    console.log(local_user);
    const websocket = new WebSocket(
        'ws://'
            + window.location.host
            + '/ws/chat/'
            + local_user
            + '/'
    );
    websocket.onopen = function (e) {
        console.log('连接成功');

    };

    //断开原因
    websocket.onclose = function (e) {
        console.log('websocket 断开: ' + e.code + ' ' + e.reason + ' ' + e.wasClean);

    }
    //定义一个发送消息的函数
    function sendWebsoketMsg(msg){
        websocket.send(JSON.stringify(msg));

    }

    //接受服务器端的消息
    websocket.onmessage = function (e) {

        const data = JSON.parse(e.data);


        message = data['message'];
        times = data['create_time'];

        var html = '<div class="message">\n' +
            '                      <div class="user-head">\n' +
            '                        <img src="{{to_users_img_path}}" alt="我的头像" >\n' +
            '\n' +
            '                      </div>\n' +
            '                      <div class="content">'+message+'</div>\n' +
            '                    </div>';
        var msghtml = '<i class="message-count" style="float: right;background-color: rgb(252, 85, 49);width: 7px;height: 7px;display: block;border-radius:50%"></i>'
        if (data['sender'] == activeUser){
            $('#send_message').before(html);
            $('#msg-count').before(msghtml);
            $("#messages").scrollTop($("#messages")[0].scrollHeight);
        }

    }


</script>
后端models.py中代码如下
class Message(models.Model):
    sender = models.ForeignKey(UserProfile,related_name='send_messages',on_delete=models.CASCADE,null=True,verbose_name='发送者')
    recipient = models.ForeignKey(UserProfile,related_name='receive_messages',on_delete=models.CASCADE,null=True,verbose_name='接收者')
    create_time = models.DateTimeField(auto_now_add=True,null=True,verbose_name='创建时间')
    message = models.TextField(null=True,verbose_name='消息')
    unread = models.BooleanField(default=True,verbose_name='是否未读')
    objects = models.Manager
    def __str__(self):
        if self.message:
            return self.message
视图views.py中发送消息post请求主要代码如下
    def post(self,request,to_user):

        if self.request.user.is_authenticated:
            username = self.request.user.username
            if str(username) == str(to_user):
                return redirect(reverse('main'))
            users_img_path = UserProfile.objects.filter(username=username).values('image')[0].get('image')
            message = BeautifulSoup(request.POST.get('message',''),'html.parser').get_text()
            if not message:
                return redirect(reverse('chats',args=(to_user,)))
            sender_id = UserProfile.objects.filter(username=username).values()[0].get('id')
            to_user_id = UserProfile.objects.filter(username=to_user).values()[0].get('id')
            to_users_img_path = UserProfile.objects.filter(username=to_user).values('image')
            if to_users_img_path:
                to_users_img_path = to_users_img_path[0].get('image')
            else:

                return redirect(reverse('main'))
            ms = Message.objects.create(sender_id=sender_id,recipient_id=to_user_id,message=message)
            #以接收者为组名
            group_name = to_user
            #获取当前频道
            channel_layer = get_channel_layer()
            async_to_sync(channel_layer.group_send)(
                group_name,{
                    'type':'receive',
                    'message':message,
                    'recipient':to_user,
                    'create_time':str(ms.create_time),
                    'sender':username,
                    'to_users_img_path':to_users_img_path

                }
            )
最后效果如下
实现了对方发来消息我界面不用刷新来查看消息了。完美!
如果上述代码帮助您很多,可以打赏下以减少服务器的开支吗,万分感谢!


 赣公网安备 36092402000079号
点击此处登录后即可评论